
Version 7.8 First Published 6 Mar 2019 Last Updated 18 Oct 2023 Difficulty level : Moderate
Section Links:
Introduction
Twips, Pixels & Points
Form Components
Using the Example Application
Using Wizhook
Future Developments
Acknowledgements
Version History
Downloads
YouTube Video
Feedback
1. Introduction Return To Top
This example application was developed in response to various forum questions including:
MS Access - X Y Cordinates of Control Top (ironfelix717 @ AccessForums.net)
Access 2016 - api functions (lana @ Access World Forums)
Moving (and resizing) objects to precise locations on the screen is very easy using the Move method
expression.Move(Left, Top, Width, Height)
For example, Forms!Form1.Move 100,200,500,350
This moves the top left of Form1 to x-y co-ordinates 100,200 and changes the width and height to 500 & 350 (where all values are in twips – see later)
Similarly, controls can easily be moved on a form.
For example, this code moves Box9 so it is located immediately below textbox Text2:
Me.Box9.Left = Me.Text2.Left
Me.Box9.Top = Me.Text2.Top + Me.Text2.Height
The example application does both of the above simple tasks but also demonstrates some much more complex processes.
For example, it shows how:
a) A popup form such as a customised zoom box can be moved to a precise position over another
form irrespective of form settings
b) A listbox record can be ‘selected’ without clicking on the listbox.
This is done by accurately detecting the record underneath the mouse cursor based on the height of each row in the listbox.
This means the record can be used e.g. to open a filtered form / view an image without actually selecting the listbox record!
c) The x-y coordinates of an object on a form can be determined and the object nudged by a specified amount in any direction
Each method has been successfully tested using a variety of situations:
a) Navigation bar - maximised/minimised/removed
b) Ribbon - maximised/minimised/removed
c) Application window – maximised / restored
e) Different screen sizes and resolutions
f) Enlarging the screen display setting from the default 100% to 125%
Different form conditions have also been tested including:
a) Border style – none / thin / sizable / dialog
b) Scrollbars – none / horizontal only / vertical only / both
c) Navigation button bar – visible / hidden
d) Record selectors – visible / hidden
e) Different fonts – font name / point size & style (bold / italic / underline)
NOTE:
It is NOT possible to hide the application window for this example application.
Doing so would require the use of popup forms which isn’t possible here due to the simultaneous use of 2 forms in several places
There are many complications that need to be managed for all of this to work well:
2. Units of measurement – twips, pixels and points Return To Top
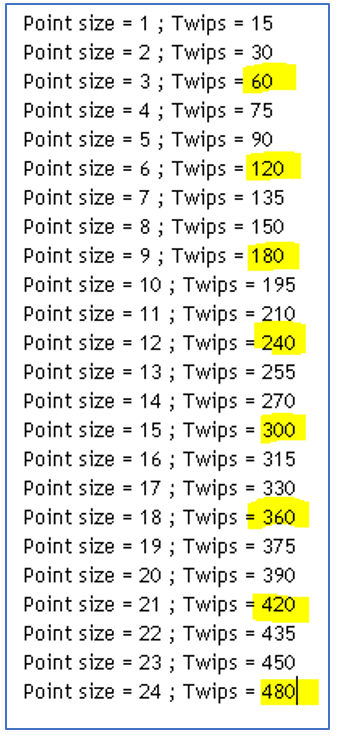
The position of objects in the Access window is determined in twips (one twentieth of imperial point size) where
1440 twips = 1 inch or 567 twips = 1 cm
The x-y coordinates of the top left of the application window are 0, 0
However, the position of the mouse cursor is measured in pixels with reference to the overall screen:
1 pixel (px) = 15 twips so 96px = 1440 twips = 1 inch
Font size is measured in points (pt) where 1 point = 20 twips
A 72 point font = 1 inch = 1440 twips = 96px ;
Similarly 12pt = 16px = 240 twips = 1/6 inch, 3 points = 60 twips = 4 px etc
Complications arise with font sizes that are NOT factors of 72. For example:
a) 11 pt font = 220 twips = 14.667 px . . . but as you cannot have a part pixel that actually requires 15 px
b) 10 pt font = 200 twips = 13.33px . . . so this takes up 14px which is a significant difference
For further info, see https://websemantics.uk/tools/convert-pixel-point-em-rem-percent/
This makes point to pixel conversions difficult to do precisely and can lead to placement errors on the screen
There are THREE main ways of doing this point to pixel conversion:
a) Use conversion values as above with arbitrary corrections to align objects as well as possible
This MAY be adequate for a selected font name & size but is very likely to be inaccurate if either / both of these are altered.
b) Use values calculated by a direct points/pixels to twips conversion based on code such as the ConvertToTwipsYFromPoint function based on the widely used
GetSystemMetrics API. This manages the inexact conversion between 72 points and 96 pixels per inch by building in a 'jump' every 3 points
This approach can work reasonably well for some standard fonts between about 10pt & 14pt.
However, it gets increasingly inaccurate for much larger/smaller fonts.
It also makes no allowance for certain fonts e.g. Comic Sans being taller than the normal value for that point size.
The image below shows a capital A in 13 different standard Windows fonts - all are 72 points

Stephen Lebans uses an enhanced version of this code in several example applications such as
http://www.lebans.com/SelectRow.htm
http://www.lebans.com/textwidth-height.htm
The code I originally developed was partly based on the second example above.
I am always amazed by Stephen's ability to do things that us mere mortals would never achieve alone.
Even so, the results using his code are not perfect for all situations
c) However, there is a MUCH better method which makes use of the little known VBA WizHook function.
This actually measures the height and width of a character string based on the font name, font style (normal, italic) etc.
This approach should ALWAYS work no matter what the situation. My tests confirmed that to be so.
One issue with WizHook is that it is a hidden function which, despite having been available for about 20 years, is not documented by Microsoft.
In theory it could be removed in a future release, but as it is used in some built-in wizards, I believe that to be highly unlikely.
However, there is very little information about this function online apart from:
http://www.mvp-access.es/juanmafan/wizhook/wizhook.htm (in Spanish)
http://pointltd.com/Downloads/Files/WizHook.pdf (in English)
https://team-moeller.de/?Tipps_und_Tricks:Wizhook-Objekt (in German)
NOTE:
The third link above is the most comprehensive. It includes an example app you can use to test the various WizHook features
See additional information about the WizHook function at the end of this article.
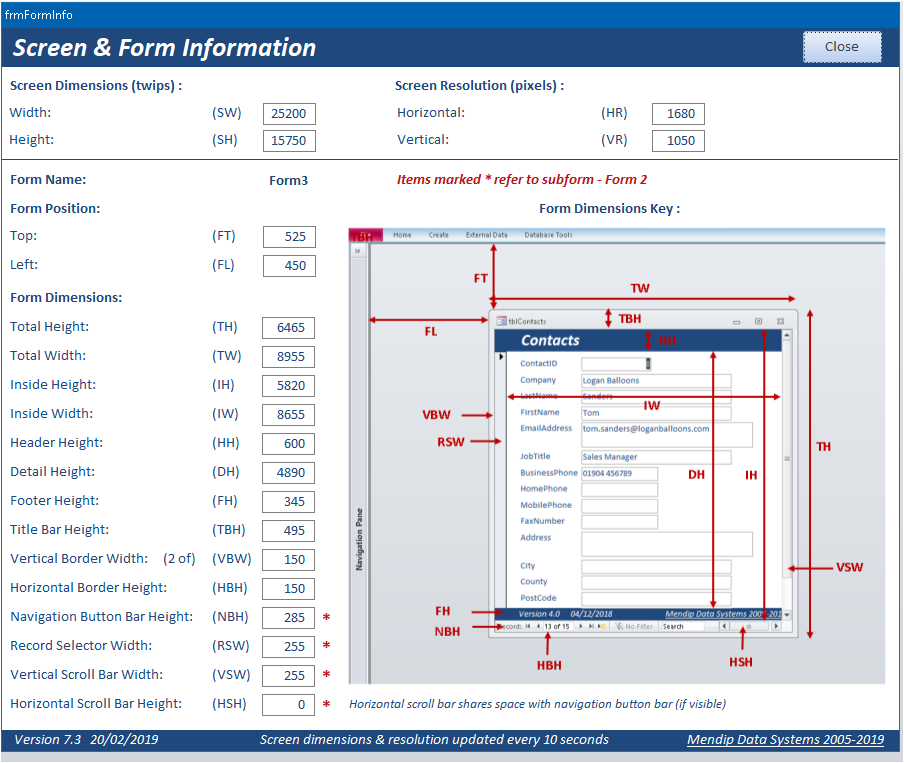
3. Form components Return To Top
In order to locate an object precisely on / over a specific control on a different form, we need to know the size and position of each component of a form.
However, not all items will be present depending on form settings.
The screenshot shows the form component items being calculated by the application for use as required
4. Using the example application Return To Top
The example application includes an Images folder
For the purposes of this example, this needs to be a subfolder of the example application
The size of the navigation pane, ribbon and application window can all be controlled from the startup form.
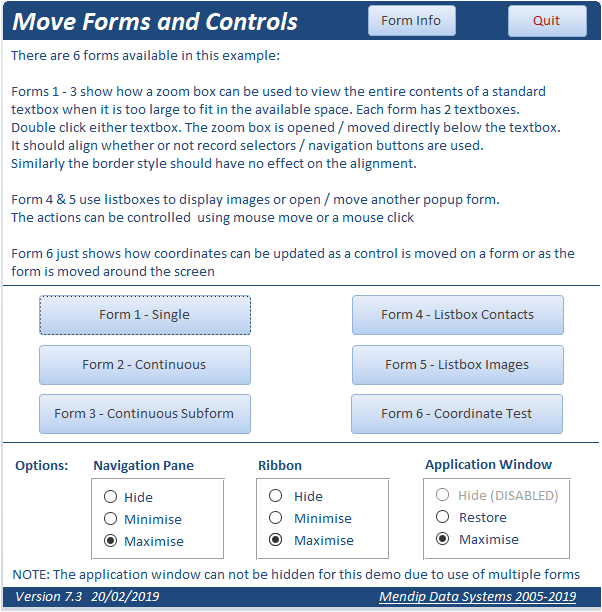
There are 6 test forms available:
Forms 1 - 3 (Single / Continuous / Continuous Subform)
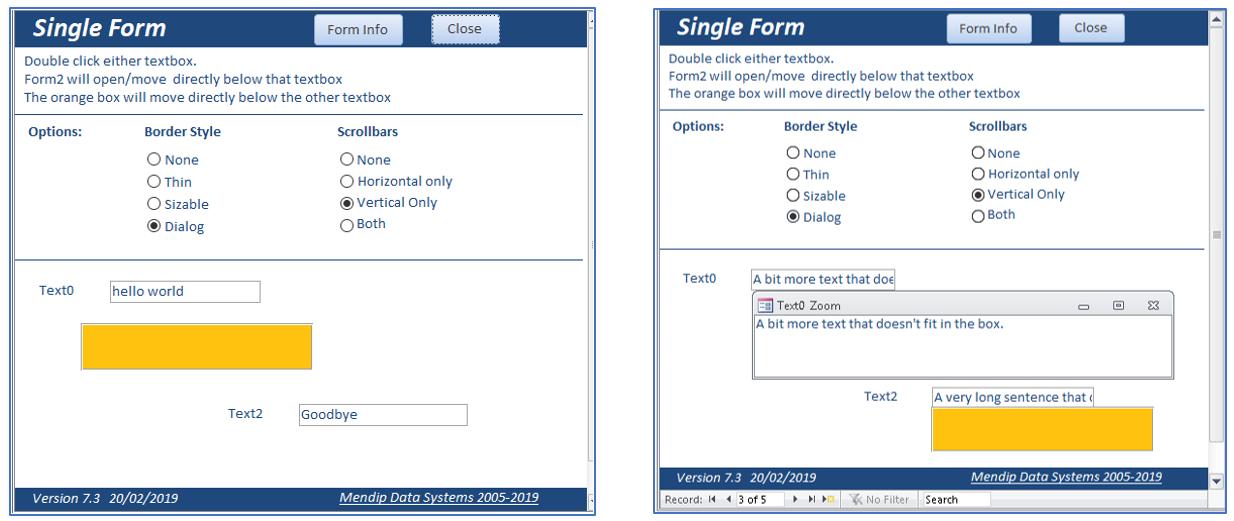
Each of these is designed show how a zoom box can be used to view the entire contents of a standard textbox when it is too large to fit in the available space.
Each form has 2 textboxes and several different options that can be applied
Double click either textbox. The zoom box is opened / moved directly below the textbox.
Single form
NOTE: In version 7.8, two variations on this form are also provided:
a) Form 1A - the form header / footer sections are hidden
b) Form 1B - the form header / footer sections have been removed
In both cases, updated code in the ResetWindowSize procedure in modFormInfo handles both cases & ensures the zoom box is still positioned correctly.
Continuous form
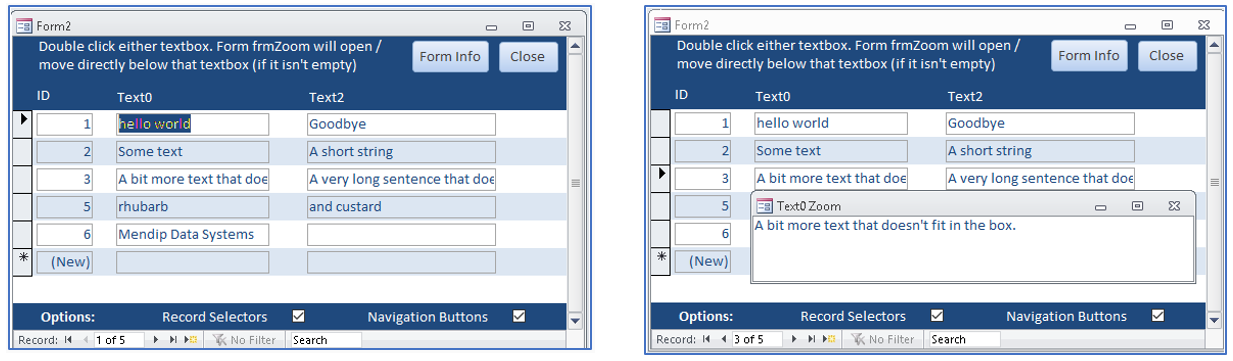
Form & subform
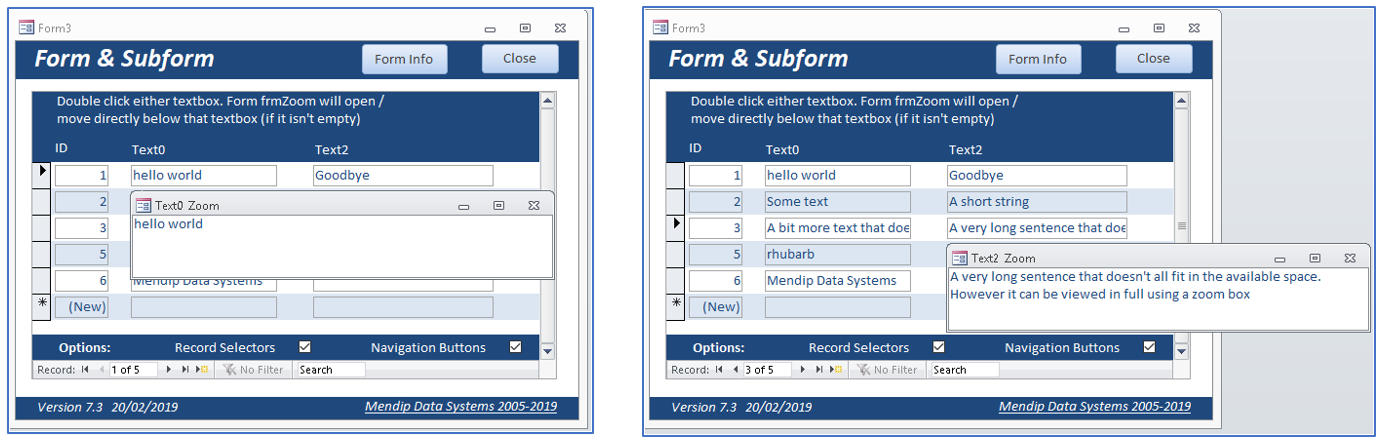
The zoom box should align closely whether or not record selectors / navigation buttons / scrollbars are used.
Similarly, the border style should have no effect on the alignment.
Typical code - this is taken from Form2:
Private Sub Text0_DblClick(Cancel As Integer)
'close zoom form if open
If CurrentProject.AllForms("frmZoom").IsLoaded = True Then DoCmd.Close acForm, "frmZoom"
strText = Nz(Me.Text0, "")
strCaption = "Text0 "
'check record containing text has been clicked
If Nz(Me.RecNum, "") <> "" And strText <> "" Then
intLeft = Me.WindowLeft + Me.Text0.Left + intRecSelWidth
'check if subform
If IsSubform Then
intBase = intTitleBarHeight + intHeightHeader + Me.WindowTop + Me.Text0.Top + Me.Text0.Height _
+ (Me.RecNum - 1) * Me.Detail.Height - intNavBarHeight - intBorderHeight
Else
intBase = intTitleBarHeight + intHeightHeader + Me.WindowTop + Me.Text0.Top + Me.Text0.Height _
+ (Me.RecNum - 1) * Me.Detail.Height
End If
'open / move the form
DoCmd.OpenForm "frmZoom"
Forms!frmZoom.Move intLeft, intBase
End If
End Sub
The IsSubform code used above is as follows:
Private Function IsSubform() As Boolean
Dim bHasParent As Boolean
On Error GoTo NotASubform
' If opened not as a subform, accessing the Parent property raises an error:
bHasParent = Not (Me.Parent Is Nothing)
IsSubform = True
Exit Function
NotASubform:
IsSubform = False
End Function
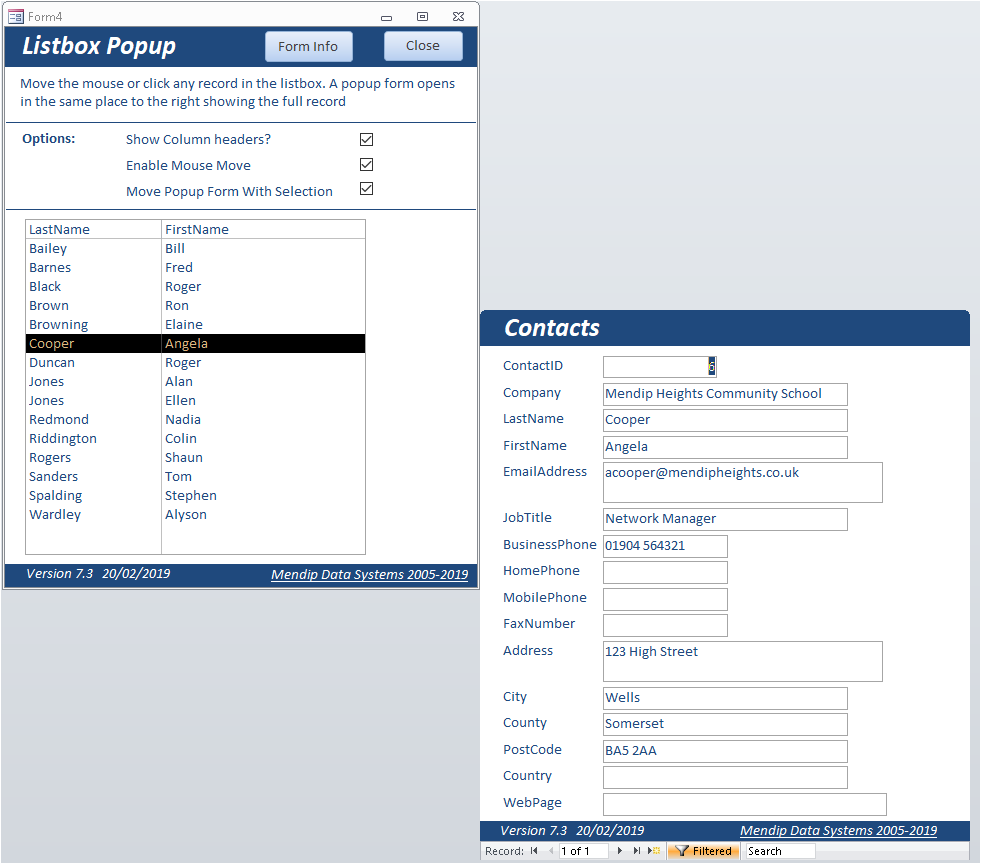
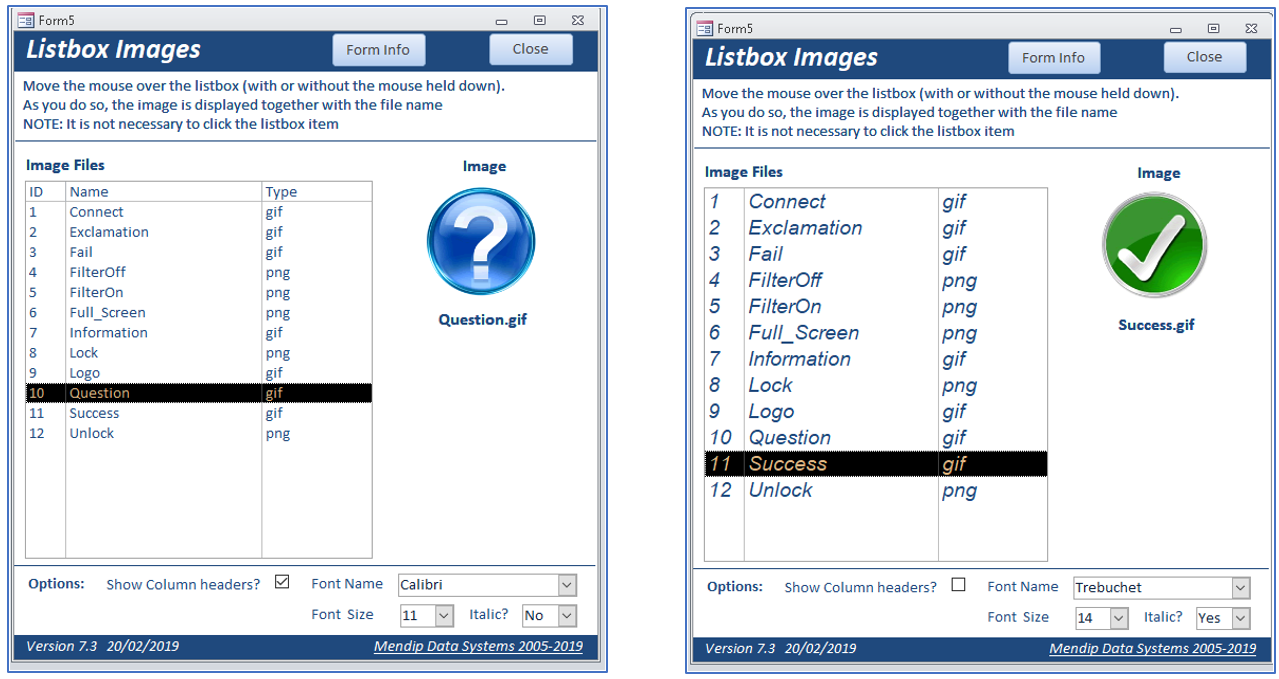
Forms 4 & 5 - Listboxes
These forms show how a listbox item can be 'selected' using a mouse move event without clicking the listbox.
NOTE:
To indicate which item has been 'selected', it is also highlighted just as though it had been clicked on.
Form 4: Moving the mouse over the listbox to 'select' a row opens / moves another popup form to the related record and (optionally) moves the popup form to align with the 'selection' made.
Form 5: Moving the mouse over the listbox to 'select' a row displays the related image for the highlighted record.
For comparison, the actions can be controlled either using mouse move or with a standard mouse click
As stated earlier in this article, records are NOT selected when moving the mouse over the listbox.
Instead, code is used to determine the listbox position based on the calculated height of each listbox row and the mouse cursor position on the screen.
The listbox row height depends on several things including font name, point size and the built-in 1 pixel (15 twips) space left between each row for legibility.
To complicate matters, the first row is 45 twips (3 pixels) taller than all following rows.
That happens whether or not column headers are displayed!
All that information is used to highlight the record under the cursor so the data in the listbox record can be ‘read’ just as if it had been selected by clicking
Form options – mouse move code can be enabled / disabled
Listbox options – column headers on/off ; change font name and font size, normal or italic style
Listbox with filtered popup form
Click below to watch a short video (duration = 24s) demonstrating the effect:
Listbox with image control
Click below to watch a short video (duration = 33s) demonstrating the effect:
In both forms, the height of each listbox row is calculated using code like this:
Private Function GetListboxRowHeight()
'Wizhook converts row height perfectly
WizHook.Key = 51488399
Dim lx As Long, ly As Long 'width & height of character string
Dim LBRH As Long 'LBRH = listbox row height in twips
With Me.lstContacts 'listbox name
If WizHook.TwipsFromFont(.FontName, .FontSize, .FontWeight, .FontItalic, .FontUnderline, 0, _
"ABCghj", 0, lx, ly) = True Then
LBRH = ly + 15 'font height +15 twips (1px space between rows)
End If
End With
End Function
This is used in the listbox mouse move code to determine the ‘current’ record for highlighting / reading.
For example:
Private Sub lstImages_MouseMove(Button As Integer, Shift As Integer, x As Single, y As Single)
'get record in listbox by moving over record
'LBRH =listbox row height - calculated in GetListboxRowHeight procedure
If LBRH = 0 Then Exit Sub
Screen.MousePointer = 1 'arrow - helps prevent flicker
intColumnHeads = Me.lstImages.ColumnHeads 'are column headers visible?
'-1 if true, 0 if false so subtracting it adds 1 if headers shown
'deduct 45 to allow for larger top row
lstPos = ((y - 45) \ LBRH) + 1 + intColumnHeads
If lstPos <> OldlstPos Then 'cursor has moved
LC = Me.lstImages.ListCount + intColumnHeads '-1 to allow for header
Me.lstImages.Selected(lstPos - 1 - intColumnHeads) = True 'highlight on mouse move
'get image path
strPath = Nz(DLookup("FileName", "tblImages", "ID=" & lstPos), "") & "." & _
Nz(DLookup("FileType", "tblImages", "ID=" & lstPos), "")
If strPath <> "." Then
Me.lblFileName.Caption = strPath
strPath = CurrentProject.Path & "\Images\" & strPath
Me.Image1.Picture = strPath
End If
'show image if in list
If lstPos > 0 And lstPos <= LC Then
Me.lblImage.Visible = True
Me.Image1.Visible = True
Me.lblFileName.Visible = True
Else
Me.lblImage.Visible = False
Me.Image1.Visible = False
Me.lblFileName.Visible = False
'deselect all records if move beyond end of list
For N = 1 To Me.lstImages.ListCount
Me.lstImages.Selected(N) = False
Next
End If
OldlstPos = lstPos
End If
Screen.MousePointer = 0 'reset to default
End Sub
NOTE:
This approach only works where all listbox rows are visible on the form.
The code cannot determine the position correctly where a vertical scrollbar is needed for certain rows.
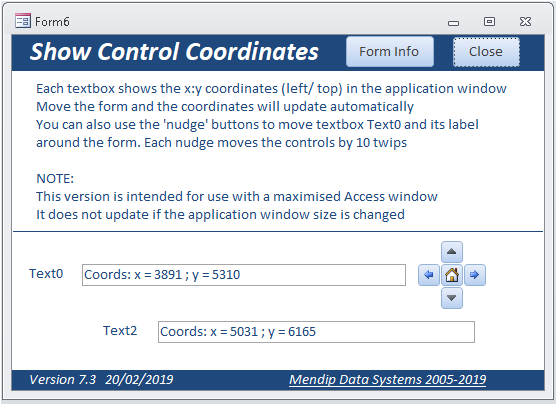
Form 6 - Coordinate display
This shows how coordinates can be updated as a control is moved on a form (using 'nudge' buttons) or as the form is moved around the screen
Each 'nudge' moves both textbox and label by 10 twips in the direction of the arrow.
The 'home' button restores the original position.
5. Using WizHook and other hidden VBA functions Return To Top
Access contains many built-in hidden functions - most are undocumented and it is always possible that they could be removed when new versions of Access are released.
Over the years, I have used a number of these hidden functions including LoadFromText, SaveAsText, Wizhook and several others.
All of the ones I've tried are functional and indeed useful.
To view hidden functions in the VBE right click in the object browser and select Show Hidden Members
NOTE:
You can use any of these functions even when they are hidden
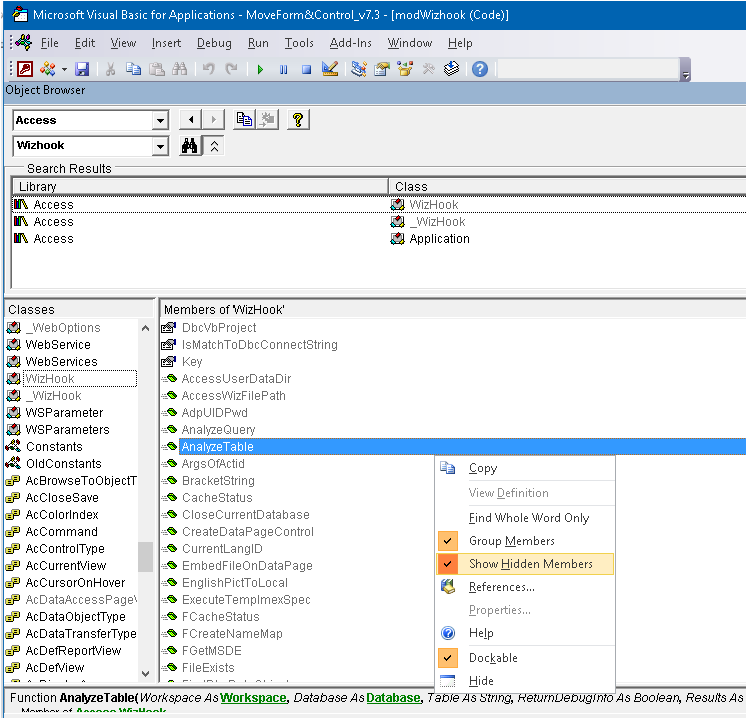
The screenshot above shows some of the members of the hidden Wizhook function. There are many more as you will see if you check for yourself
I've tried several of them and found some very useful features.
However, I've no idea what a few of them do ....YET!
Give me enough time though . . . !
Wizhook has one additional feature that is, as far as I know, unique.
You MUST supply the Wizhook key in your code or it won't work
Code:
WizHook.Key = 51488399
Many thanks to skrol for alerting me to that key value back in 2017.
Skrol is the author of the excellent free Access add-in V-Tools
The V-Tools deep search feature is particularly useful.
For a detaled reference guide to the WizHook object and its many members, see my article The WizHook Object - Hidden, Undocumented . . . But Very Useful
6. Future developments Return To Top
I hope the ideas in this example application will prove useful to others
I have successfully used the movable zoom box form for a long time with several of my applications
I also have a few ideas for deploying the listbox mouse move highlight & 'select' code in real world applications of my own.
I would be very interested in getting user feedback about how this code can be applied in other Access applications. Please contact me using the feedback form below.
7. Acknowledgements Return To Top
I am extremely grateful for the valuable assistance provided by the following:
a) Stephens Lebans – various conversion functions partly based on the GetSystemMetrics API
b) Chris Arnold for suggesting various improvements to prevent screen flicker with the mouse move code used in the listbox example forms 4 & 5
c) AccessForums.net member daolix for alerting me to the potential use of the WizHook function for this example
d) Skrol for providing the WizHook key
8. Version History Return To Top
Version Date Notes
7.4 26/03/2019 Initial Release
7.5 20/06/2022 Changed to use shared images
7.6 26/06/2022 Added code to centre form frmFormInfo
7.7 14/09/2022 Fixed 64-bit issue in class module clFormWindow
7.8 18/10/2023 Updated ResetWindowSize procedure to handle cases where form sections are hidden or removed.
9. Downloads Return To Top
Click to download:
Move Form & Control v7.8 (ACCDB file with shared images for form 5) Approx 1.8 MB (zipped)
Move Form & Control (PDF version of this article) Approx 0.8 MB (zipped)
10. YouTube Videos Return To Top
I have created a longer YouTube video for my Isladogs on Access channel demonstrating the use of the WizHook TwipsFromFont function.
This is now available at: Using WizHook - Twips From Font function or you can click below:
In addition, you can watch my previous YouTube video on the same channel which is an introduction to Wizhook and a few of its simpler functions.
This is now available at: Wizhook: A Hidden (But Very Useful) Access Object or you can click below:
Further videos on WizHook are also planned
If you subscribe to my Isladogs on Access channel on YouTube, you will be notified whenever new videos are released.
11. Feedback Return To Top
Please also use the contact form below to let me know whether you found this article/example app useful or if you have any questions.
Colin Riddington Mendip Data Systems Last Updated 18 Oct 2023
|
Return to Access Articles Page
|
Return to Top
|